
There is a reason why you always stumble playing music, often in the very same spot. And I’m going to give you the secret to fixing musical mistakes. But first, let’s . . .
Set the Scene
You’re playing along, feeling the flow of that lovely little Celtic tune when all of the sudden the panic arises. Here it comes! That really tricky spot!
 Like a deer in the headlights, you freeze up, then stumble forward. Oh, how you wished this time it would be different. Alas, terror is not helpful to fixing musical mistakes. Nor is the frustration that comes from having the same problem occur over and over and over.
Diagnosing and Fixing Musical Mistakes
If you repeatedly stumble in the same place in your harp music, that means you have a practice spot. A practice spot is a recurring musical mistake that is demanding individual attention, like a new string that won’t stay in tune.
Maybe you already know you have a practice spot. Maybe you’ve even tried the practice techniques on this page. (If not, what are you waiting for?) In spite of what you’ve tried, you still can’t seem to make the leap from the easier part into that new territory. Transitions are hard, aren’t they?
The good news is, there is a simple and fail-safe technique to fix your practice spots or musical mistakes. I call it the “Play/Place Technique.” That’s a utilitarian name, I know, but I hope it will help you remember exactly what you need to do.
So, what’s the bad news?
Well, all of us resist taking things apart, as we’re addicted to forward motion, nowhere more so than in playing music. If I tell you–as I’m about to–to play the last bracket of the easy phrase, and then just replace the first bracket of the troublesome one, WITHOUT playing it. you’re going to resist.
Go ahead, try it. It may sound simple, but it’s not easy. Unless you are super dedicated and experienced with practice strategies, your urge to play what you’ve just placed will be really strong. Like, last-cookie-in-the-cookie-jar strong.
Here’s why you want–but must resist–that urge to play on. Your brain adores the satisfaction of playing on. However, for your brain to actually learn the motion of going from one bracket to the next–through what has proven to be a tricky transition–you have to give it the smallest, most doable chunk. And then repeat it enough times for it to become automatic.
By playing the bit before the spot, and then replacing the next, you’re giving your brain that smallest chunk. Try it now, with the tricky little transition that causes the problem.
What If My Fingers Don’t Cooperate?
Now, your brain may have still thrown up its hands, as if to tell you that it doesn’t know where to put those fingers for the second bracket. That’s critical information letting you know that your brain simply needs more guidance.
To continue on the quickest path to fixing the musical mistake, you’ll need to add one more thing: talking out loud. (Really, proven by research to be the best thing ever–I am not making that up).
How can talking out loud help you fix a musical mistake? You will patiently explain to your brain that, while the first bracket is four notes stacked up in a row, the second one has a gap near the bottom, making it look like a monkey with a tail (or whatever your brain will like). In fact, the gap that makes it look like a tail is over the B string, so you tell yourself you won’t put a finger there.
Or, maybe you notice that your whole hand has to shift down, exactly a sixth, and say so out loud. Or, you notice and remark on the fact that there is a common note between two unconnected brackets–the A string!
Now that you’ve given your brain the missing puzzle piece of information to fix the mistake, you’ll go back to the Play/Place Technique. This time, your fingers will know exactly where to go.
Play the first bracket, then place the second. If they’re connected brackets, pretend that you’re swinging on that pivot note, and place the remaining fingers exactly at the same time. You may only need to Play/Place a couple of times now, because your brain has had an aha moment and, lo and behold, it suddenly knows what to do.
At the request of a blog reader, I’m adding a visual example to clarify this process. Here are two measures from Clair de Lune).
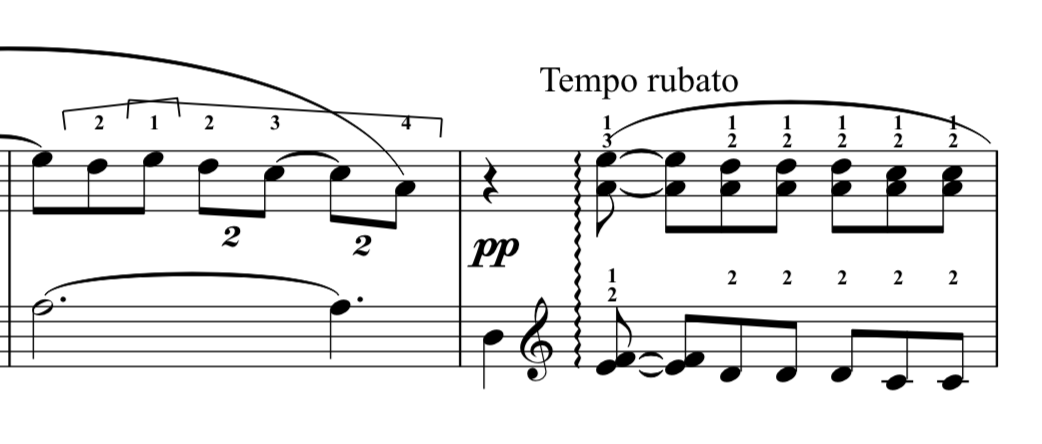
The first task is to identify your stumble spot.
- Is it getting to the low D (under the pp) from what came before?
- Is it getting from the low D to the chord that comes next?
Let’s say it’s the latter. You might tell your brain something, like, “I play that low D with finger 4 and then leap just higher than an octave to land the E/F with fingers 1 and 2. I aim my thumb for the colored string (F); that helps me see it.” That’s the Talking Out Loud part.
Next, you use the Play/Place Technique. In this case, you play the D, then land the E/F, without playing it. Do that until it’s easy.
Next, look at the right hand and talk yourself through how to get from the last A (before the pp), to the chord. You notice and tell yourself , “I’ll be playing the same note (the A)! A finger switch from 4 to 3 and my thumb a fifth higher is all that’s needed.”
Now you can practice the RH with the Play/Place Technique, playing the bracket with the duplets and then landing the 5th without playing it. When each hand is easy, you’ll do the Play/Place Technique with both hands at the same time.
For the quickest success, you won’t actually play the rolled chord, let alone the rest of that new measure, until you have fixed the problem with the transition.
Use the Play/Place Technique and Talking Out Loud to Fix Those Musical Mistakes
So why do you always stumble in the same spot in your music? Every time you stumble, your brain is raising its hand, asking for help. It’s telling you that you haven’t given it quite enough information for it to tell your fingers exactly what you want them to do, so they’ll do it, every time.
And how to fix it? If you take a moment to give your brain careful instructions, plus practice with the Play/Play Technique, you will conquer the spot–and your terror–allowing you to achieve flow though your piece much faster than if you just keep powering through and hoping for the best. I’ve seen this combo of the Play/Place Technique and talking out loud work over and over, for both myself and my harp students. Give it a try!
Sometimes, we all need help seeing the issues we face as harpists and, even harder, figuring out what to do about them. Helping students do that is my job and my passion, and right now I am taking a few new harp students, online or in person (in the Denver area). Let me know if you’d like to have someone coaching you to help you reach your own harp’s delight.
This post has been edited to include the example from Clair de Lune.